Wednesday, January 28, 2015

Watercycle Books


Hello!

Today we continued with watercolor but integrated it into the Water Cycle!
We talked about the water cycle (the teacher also reviewed before) and what the different parts of it was. The different parts we came up with was Evaporation, Condensation, Dew, Precipitation, Collection, Runoff, and Transpiration. 

Here is the powerpoint I used:
https://docs.google.com/presentation/d/1_nDeQwEJwk01b5qhirpcID2W-f5zuftB0hsKFD_5VWU/edit?usp=sharing

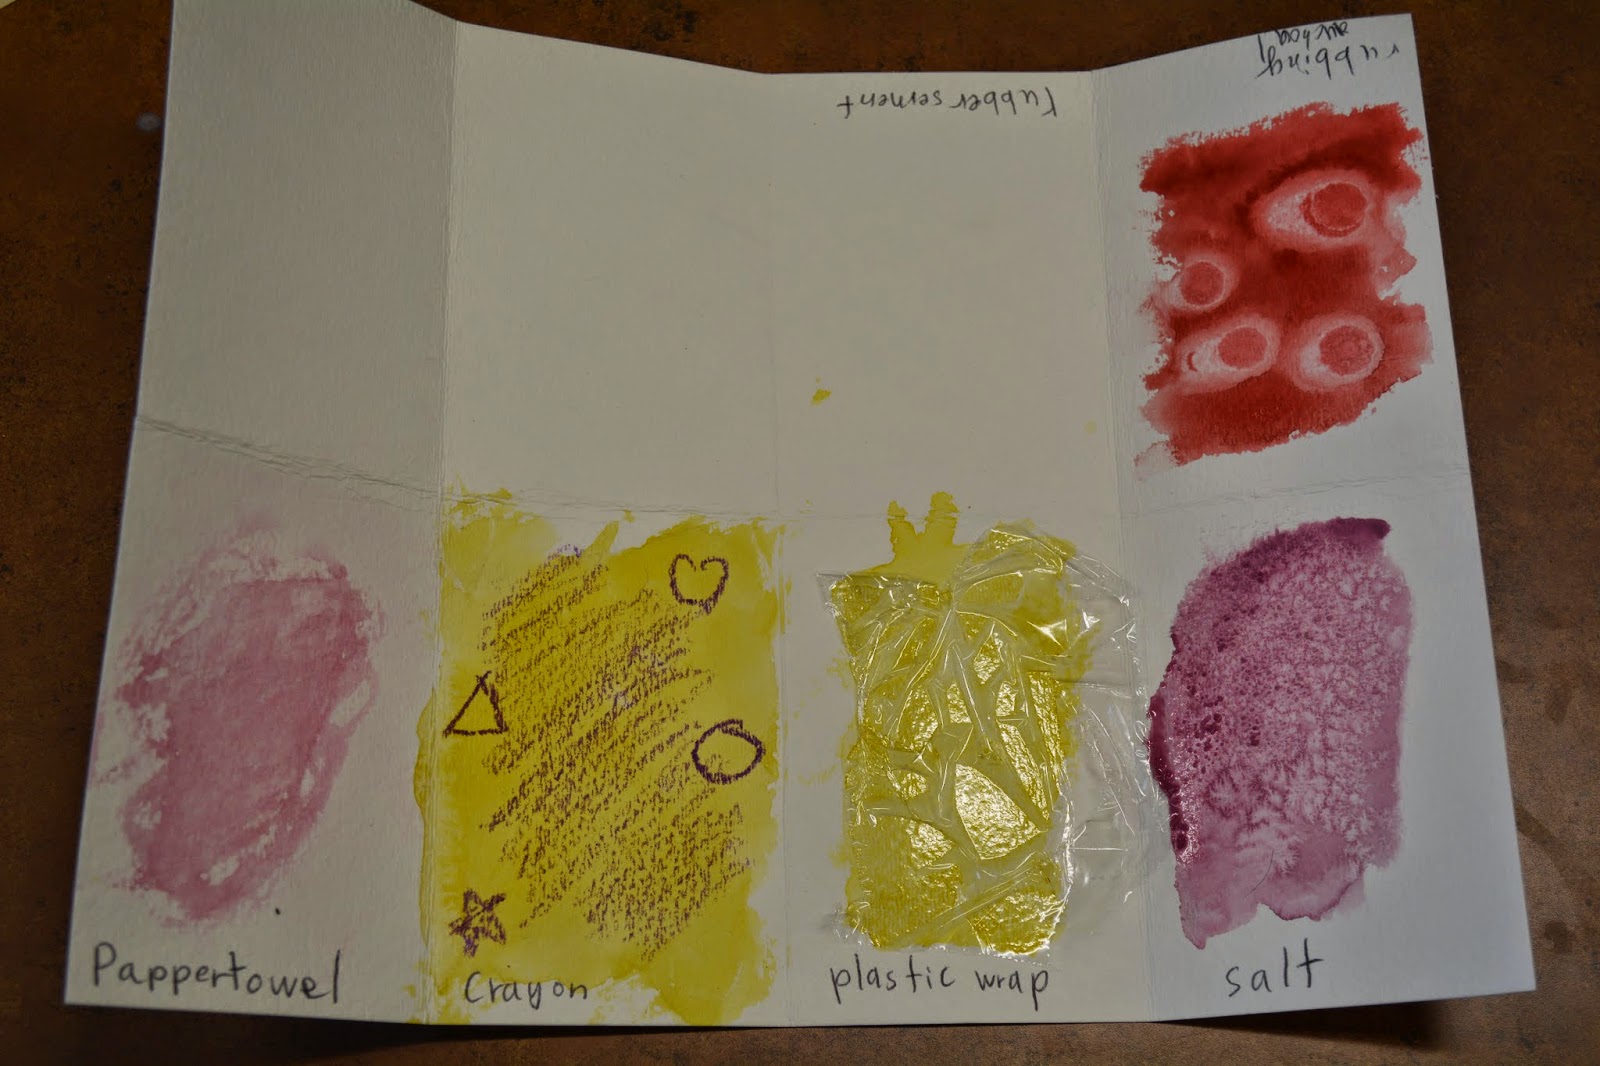
We then talked about different watercolor landscape paintings and how different colors besides blue can be part of the sky. We also talked about what different techniques we could use for the different parts of the water cycle.

We folded our paper into 8 sections again. 
I wrote on the board on what step to put on what part of the paper.

When the students asked what certain step meant I redirected them into asking their peers. This helped the number of questions that I received so I could help in other ways.

I think the best way to make this concept stick is to create a personal watercolor landscape painting with the techniques before making the books. They ended up trying to make a technique book again without doing much detail or showing their understanding of what each part of the water cycle means with mini landscapes showing the parts. It was a little bit frustrating but it is good to know what to do for other classes. 

The next step after letting the paint dry they will make them into little foldable books!


The kids were super excited to use the different water color techniques again!


Tuesday, January 27, 2015

Watercolor Hypotheses


Today we made hypotheses about what different things would happen if we put watercolor with different items.

Here is the power point that I used: https://docs.google.com/presentation/d/15OGkc3DP7fJousLu0o_gQ7_kBes6n6IA8S4vlRu6TAc/edit?usp=sharing

I used an elmo as I explained the different techniques.

We started out as talking about what a hypothesis was and continued to make hypotheses on the different watercolor techniques I showed.

We all folded our watercolor paper into 8 sections. We used portrait and landscape to talk about the different ways to fold the paper.

First I showed some techniques that I know that the kids have done before on their own but didn't realize what they were doing. These were wet on wet, dry on wet, dry on dry, and flat wash. I realize now that it would have been better to do this part with them anyways.

Some of the children got distracted and didn't follow my directions even though I was quite prepared.

I knew this part would be a little confusing but I wrote this on the board so that they could see what I was doing.
I had them write on the bottom squares these techniques: Paper Towel (dab), Crayon (Use white), Plastic Wrap(leave on till dry), Salt (leave on till dry)


Once we made hypotheses and did the first 4 techniques we turned the paper around and wrote the next techniques but the words were upside down.

Once the techniques were finished we were going to make these into a folded book. That is the reason why the written names were upside down from each other. This is now a reference book of techniques they can use when making a watercolor painting.

Wednesday, January 21, 2015

Systems & Constraints


Hello!

Today was all about process instead of product. This is when the process through making an art piece is more important than the end piece.

Terms we talked about were systems, constraints, and interpretation.

Here is the power point that I used:
https://docs.google.com/presentation/d/1kn2XFMbA3wR1itNBlMvX8Io4DdSrg_aFp4mtnGOztYo/edit?usp=sharing

A system is a set of rules that a person makes up for themselves to follow. The constraints are also set up by the artist which provide structure of what can and can not be done. Interpretation is how the person decides to represent or do because based on what they understand the rule.

We discussed these terms and different artists, including myself, who have created art pieces with systems.

* The teacher taught the students how to use a contractor before I came so that the students could create different angles.

On the board I wrote down what constraints that I was giving the class.

*Fit on paper size I gave them
*One rule has to include an angle
*One rule has to include a measurement
*No pencils or pens
*Make rules as a class
*Your interpretation: your understanding
*Roll dice 25 times

Then the class came up with some ideas of what rules they would do for their projects. The teacher and I came up with the final 6 rules based on what the children discussed.

1. Draw a Pattern
2. Draw a 90 degree angle
3. Green or Pink 5 inch line
4. Character out of shape
5. Cut a shape out of a material
6. 3 sets of 3 inch yarn

The students used a dice to roll and to choose what rule to do next on their art piece.
The students were allowed to interpret the rules in anyway that they could think of. Some students had a hard time understanding this but after asking them what they thought and told them to proceed with that, they ended up with no problems.

Explaining took some time but in the end it was totally worth it. It was great to see the children come up with new ideas of how to portray the rule and to exhibit it. Each project looked very different from everyone else's! They were all very engaged and loved what they were doing!


This tool is really great to use for any type of integration in the classroom. My teacher really liked this project because when she introduces more projects she can use this layout to create a deeper understanding, and possibilities of the concept taught.


This is how far they got after 7 or 8 times of rolling the dice.


Wednesday, January 14, 2015

Abstract Kandinsky


Hello!

Today we talked about abstract art.

We started off with blind contour drawings. We talked about how these drawings may not look like the object but have an abstract look about it. We then discussed what the word abstract means and how we can draw shapes or objects that may not necessarily look like the object but may "represent" the object. There can also be lines or colors that are non-representational as well.

I then showed them different kinds of Kandinsky art. We talked about the differences between them and how some used more symbols and how some did not.


I then had them to close their eyes and listen to a song and think about what adjectives or descriptive words they would use to describe the song while a student wrote the words on the board. After discussing these adjectives we did the same process but proceeded to make some abstract art.

We started with an individual abstract art piece and one song. This was an exercise for the big class project.


Next I pulled out a large sheet of paper where students could choose a square and draw what they were feeling about the song. We did this three times. We ended up with extra squares so the teacher, Doug (Arts Bridge coordinator), and I did one of our own to contribute.


The things that we noticed that could have gone better is the choice of materials. I thought it would be easier to use color pencils and crayons so that it wouldn't get messy but the drawing ended up being not very bright or easy to see. Another thing I would change would be to have bigger squares for the children to create a response on. If I couldn't create bigger squares I would maybe have less students at a time working on the paper at a time. I also put tape on the paper to mask out the areas but they ripped the paper when trying to take it off. Next time I would use all the same tape, no tape or different taped off areas for more interesting compositions.


Overall it was quite fun seeing what the children came up with! They are such an enjoyable class!

Monday, January 12, 2015

Drawing Exercises


Hello!

Today we did a few different drawing exercises to help the students to remember to really look at the objects they are drawing instead of just at their paper.

First we talked about what contour drawings are. A contour drawing is the outline of an object. This is what you would see if the object were to cast a shadow.  We talked about blind contours and following the edges with your eyes as you draw. The students were not allowed to look down at their drawings and it was really hard for them.

Next we talked about the proportions of the human face. We discussed step by step where generally each area of the face. I had them to look at their partner to discuss the different shapes of everyone's faces and how different each face is. I think it would have worked better for each student to have their own mirror but this worked as well. This was also fun to talk about because we used fractions to explain the different parts.

Next we did gesture figure drawings. We talked about what the word gesture which means a quick drawn guess, of the human figure. I showed them how to draw simply with examples. I talked about drawing fast but getting enough details down. I had volunteers to stand on a stage to pick poses and for the students to gesture draw them. The students really enjoyed this! They had so much fun! They were unsure at first but got the hang of it. We talked about the angles of the shoulders and other limbs and the relations to the other parts of the body.

Link to the presentation:
https://docs.google.com/presentation/d/1VyeAJdvmhTRN9WtA7lOVuJdDlcA5EcggXp2AI3OwXsA/edit?usp=sharing

After these exercises we talked about what we liked about the exercises. They really enjoyed knowing that it was ok that they were not drawing perfect. They loved the fast pace and the openness of the drawing criteria.


Native American Personal Portraits


Hello!
It's another year in Arts Bridge! Last year I worked with a first grade class and it was fantastic! This time around I get to work with a 4th grade class! So exciting!

Today for the first lesson I wanted to get to know the students. First I introduced myself and different kinds of projects that I have created and have enjoyed. The students loved learning about what I like to do.

Next I knew that they had learned about Native Americans so I wanted to revisit their previous knowledge of Native Americans that were native to Utah. The two tribes that I talked about were the Utes ("Yoot") and the Navajos. We talked about their different cultural looks that were different than our own looks through photographs, and native american artists. Characteristics like braided hair, shoes they wore, bone jewelry, lots of color on their clothes, and of course feathers. I found some beautiful art work by David Johns, R.C. Gorman, Hastiin Klah and Clara Sherman that we talked about what they liked and disliked about the paintings I presented. We also talked about the patterns that they would have on their clothing and what kinds of clothing they wore. On the last slide I was only able to find a broad interpretation of what different colors meant for Native Americans. They really joined the idea of colors having particular meanings.

Here is the link to my presentation:
http://prezi.com/j98kpakbn9ii/?utm_campaign=share&utm_medium=copy&rc=ex0share

After having a fantastic, interesting conversation about Native Americans and art I gave them the project to complete.

I told them that I wanted to get to know and to learn about them. The constraints I gave them was to create a portrait of themselves as if they were a Native American. I told them they could use color pencils, crayons, markers and construction paper. They thought about what colors to use to mean certain things and different characteristics they would be like if they were a Native American from Utah.


This project was super fun and I enjoyed going around to listen to them and discover their little personalities!

These kids are so smart and interesting! I loved working with them!